How We Make Powder Coated and Colorized Coin Rings - part 2 of 2


Overview - The Colorized Coin Rings
In our last blog, we talked about handcrafting our Powder Coated and Colorized Rings. You can read that blog post here: https://coincrafters.net/blogs/news/how-we-make-our-colorized-coin-rings-part-1-of-2-hand-crafting-the-ring. Today, we're going to continue the process with adding color to the rings. Read on! We are going to make colorized coin rings!
They are available for sale here:
And here: https://coincrafters.net/collections/rings/products/colorized-coin-rings
What is a Powder Coat Anyhow?
Powder coating is a coloring agent that is applied electrostatically as a dry powder over metals. It is then cured via heat until it flows and forms a hard layer. This coating is very resistant to damage.
Set Up to Make Colorized Coin Rings
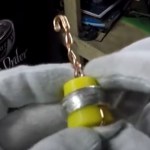
Once I've created the ring (see part 1 of this blog), I place it onto a silicon plug with a copper conductor attached to it. The conductor also must touch the ring because I use an electrical charge to attract the powder coating to the metal of the ring.

I tape off any section that I don't want to powder coat with a high temperature tape. Although I'll be removing small portions of the coating later, its easier to begin by masking off larger areas.
Since I'll be using a an electrostatic gun attached to an air compressor, now is the perfect time to get everything set up and ready to go. I attach my gun and get my stand set up with the ring. I also preheat my oven. My powder coating flows at 450 degrees Fahrenheit.
Applying the Powder Coat
Remember that conductor I attached to the silicon plug? It is going to touch the stand and ground the ring. As a result, when I spray the powder, it goes right to that ring. It doesn't take much to get a good and even covering.

Since the powder isn't adhered to the ring at this point, I need to gently transfer it to the oven and watch closely until the powder flows.

If I were to let it cure for the full 20 minutes here, it would be difficult to clean the coating off the raised surfaces of the silver that I carefully retained when I created the ring. As a result, I'm going to watch the powder flow, wait just one minute, and then take the ring out and let it cool.
Polishing and Finishing
At this point, the powder still isn't really hardened, but I use traditional jewelry filing techniques that I discussed in the last blog post to bring the raised areas of my silver coin through. The coating and color remains in the recessed areas.

I then continue curing the ring in the oven. This will make that coating really durable which is particularly important for jewelry items like rings that get a lot of abuse.
Finally, I cool the ring and finish polishing it using steel wool and a polishing cloth. Perfect!
What Colors Are Available?
We currently offer Powder Coated Rings in the following colors
- Blue
- Black
- White
- Red
- Copper/Brown
- Gold
- Patriot (Red, White and Blue)
Your powder coated ring is finished and ready to ship! Want to see this in more detail? I have a two part video available for you to view on YouTube.
Part 1 (covered in this post) is here:
https://www.youtube.com/watch?v=bTjt71qYMcQ
Part 2 (covered in the next post) is here:
https://www.youtube.com/watch?v=OPmsidE0D7g
You can also subscribe to my YouTube Channel here: